As you may or may not have noticed, certain mapping applications and certain services will not work on iPad without location services being enabled to allow those programs to access your current location. If you are trying to use these applications but keep receiving error messages, learning how to enable location services on iPad is rather easier and takes 1-2 minutes to learn and less than 30-seconds to complete. For a comprehensive guide to understanding how to enable location services on iPad, grab your device and follow these few basic steps.
- Step 1. Open up your settings application located on the home screen of your iPad; a trio of grey gears makes up the logo of the application.
- Step 2. Scroll down to options labeled ‘Privacy’ with a white hand framed out by a black box and click on the category.
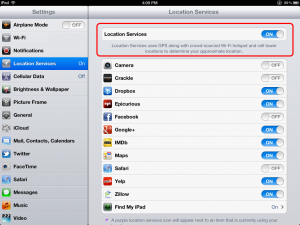
- Step 3. The very first option under this category Is ‘Location Services’ which you will want to select.
- Step 4. Look at the location services slider and see whether or not it is on or off. Sometimes, location services may be turned on but the specific application does not have permission to access this setting. If it is turned off, tap the slider and it will turn on.
- Step 5. Scroll down through the list of applications below and find the application you are trying to use. Each application will have its own separate switch by its side either reading on or off. When you finally find the application that you are trying to use, flip the switch and make sure that it is turned on.
Now you can close the settings tab, click on your round home key, and go back to the application that you are trying to access. Everything should work fine at this point and you will be able to access map information, weather, or whatever location-related service that you were initially trying to access. Following these 5-easy steps is all it takes to learn how to enable location services on iPad and now you can repeat these steps to add or revoke privileges to any other application or purpose you require.


