Adding contacts manually on the iPad is fairly easy, but it will take some time if you want to add many contacts and include for each of them a photo and an email address and so on. A more convenient way to add a lot of contacts to your device is by plugging your iPad into your computer and using iTunes to sync address books. If you want to learn how to add contacts on iPad manually though, here’s a simple guide.
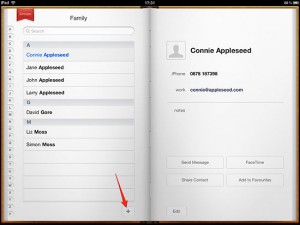
- Open the Contacts app found on the iPad home screen.
- Find the + button at the bottom of the screen and tap on it.
- Use the onscreen keyboard to type the name of the new contact you’re adding.
- Tap the Phone field and type in one or more phone numbers associated with that contact. You will be able to keep Home and Work phones separate.
- Tap the Email field and type in it the email address of the contact. You can add several if you want.
- Enter in the home page field the contact’s website.
- Add a physical address by tapping the + sign surrounded by a circle.
- Add notes relevant to that contact by tapping the notes section.
- Add a photo to your contact by tapping on the add photo field and selecting an image from your photo library. Or you can take a photo with the iPad camera.
- Tap Done when you’re finished.
- Repeat the above steps for each new contact you want to add.
- That’s about it it. You’ve learned how to add contacts on iPad.
A faster way to add new contacts to your address book is by tapping and holding email addresses or phone numbers included in emails or on web pages and selecting the Add to Contacts Option from the pop-up menu on the screen.
Now that you’ve learned how to add contacts on iPad manually you should know that you can use iCloud to sync contacts across your Apple devices. To activate contact syncing in iCloud, go to settings and turn it on.

