Adding photos to the emails you send with your iPad is not rocket science. But it’s a bit unconventional because you have to add the images with the Photos app rather than with the Mail app. Here’s a simple guide that will show you how to attach picture to email on iPad.
- Launch the iPad Photos app. It should be on your main screen.
- Go to Camera Roll, or to an album that contains the photo you want to attach to your email.
- Find the photo and tap to open it.
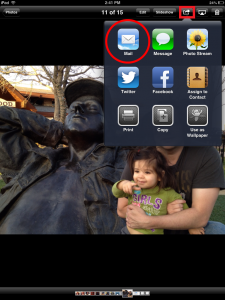
- Identify the Share button placed in the top right of the screen and tap on it. (The button looks like a rectangle with an arrow coming out of it.)
- Take a look at the other sharing options, which include tweeting, printing, or assigning the photo to a contact.
- Tap Email Photo. The Mail app will then open, and you can easily send an email with the photo attached.
- Add a subject line and a recipient to your email and tap send.
- That’s it, now you know how to attach picture to email on iPad.
Attaching Multiple Photos
You can email up to 5 photos per email from your iPad. To attach multiple photos, don’t tap on the Share button in the Photos app right away, but first tap the Edit button located in the top right corner of the screen. Tap each photo you want to email, making sure you don’t exceed the limit of 5. Then tap the Share button and choose to mail the photos.
Beware of Email Attachment Limits
Although you can send up to 5 images from your iPad, it’s usually a good idea to send no more than 2 or 3, especially if they are large, high quality images. Most email services, and especially the free ones, will have an attachment size limit, which if exceeded, will either prevent you from sending the message, or not deliver the message to the recipient. Gmail for example has a 25MB email size limit.
Now that you know how to attach picture to email on iPad your emails are bound to become more… photographic.

