Resetting your iPhone can be a powerful solution to resolve various issues, whether it’s a software glitch, persistent errors, or simply preparing your device for resale. However, resetting your iPhone should not be taken lightly, as it will erase all data and settings. In this comprehensive guide, we will walk you through the different methodsfor how to to reset your iPhone safely and effectively.
Backup Your iPhone
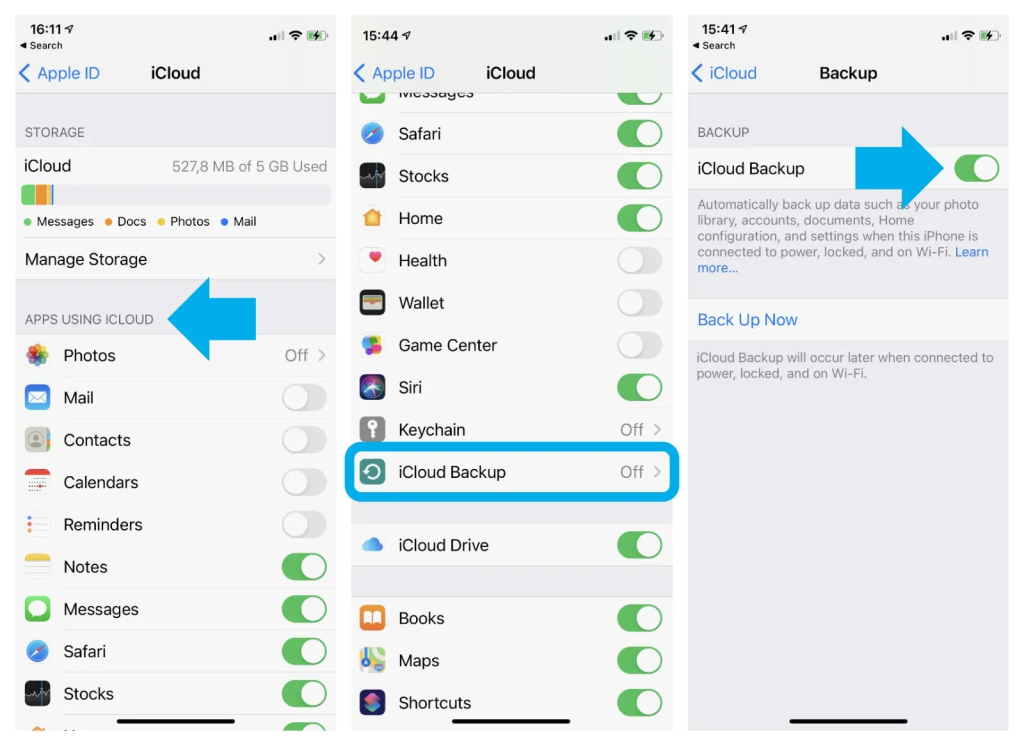
Before proceeding with a reset, it’s essential to back up your iPhone to ensure you don’t lose any valuable data. You can back up your iPhone using iCloud or iTunes/Finder (for macOS Catalina and later). To back up with iCloud, go to Settings > [Your Name] > iCloud > iCloud Backup and tap “Back Up Now.” To back up with iTunes/Finder, connect your iPhone to your computer, open iTunes or Finder, and initiate the backup process.
Understand the Types of Resets
There are two main types of resets: “Soft Reset” (also known as a force restart) and “Factory Reset” (also known as a full erase). Let’s understand the differences:
- Soft Reset: This process is useful when your iPhone is frozen or unresponsive. It doesn’t erase any data and is a quick way to restart your device. The method varies depending on your iPhone model (refer to Step 3 for details).
- Factory Reset: This process erases all data and settings from your iPhone, restoring it to its original factory state. It’s a more extensive reset and should be used when troubleshooting or preparing to sell/give away your device.
Perform a Soft Reset (Force Restart)
To perform a soft reset, follow these steps based on your iPhone model:
- For iPhone 8 and later: Quickly press and release the Volume Up button, then do the same with the Volume Down button. Finally, hold down the Side (Power) button until the Apple logo appears.
- For iPhone 7 and 7 Plus: Press and hold the Volume Down and Sleep/Wake (Power) buttons simultaneously until the Apple logo appears.
- For iPhone 6s and earlier: Press and hold both the Home and Sleep/Wake (Power) buttons together until the Apple logo appears.

Factory Reset Your iPhone
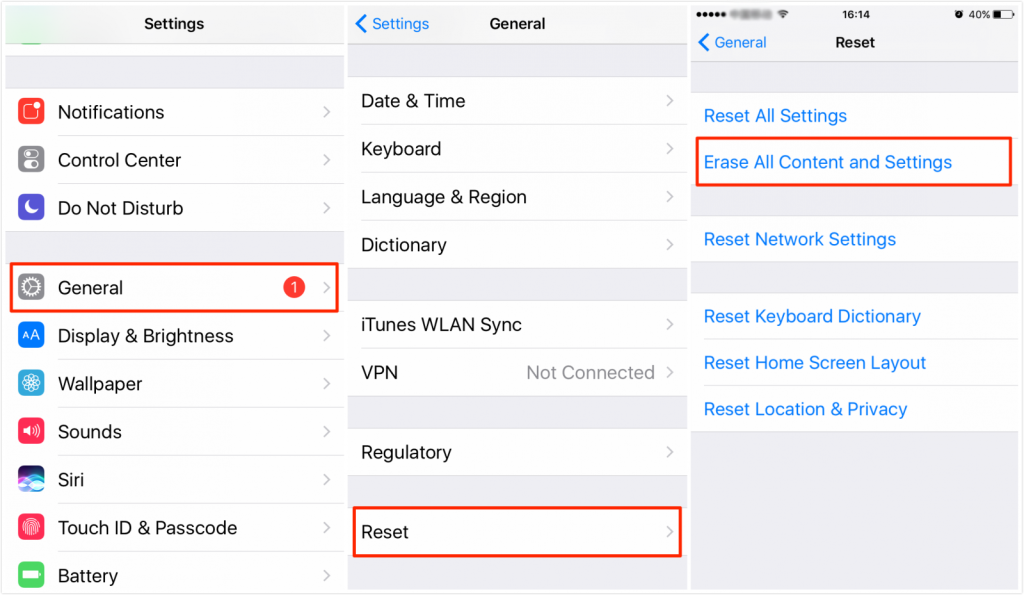
Before proceeding with a factory reset, make sure you have backed up your iPhone as this process erases all data. To factory reset your iPhone, follow these steps:
- Go to Settings > General > Reset.
- Select “Erase All Content and Settings.”
- Enter your passcode when prompted.
- Confirm the reset by selecting “Erase iPhone.”
Disable Find My iPhone
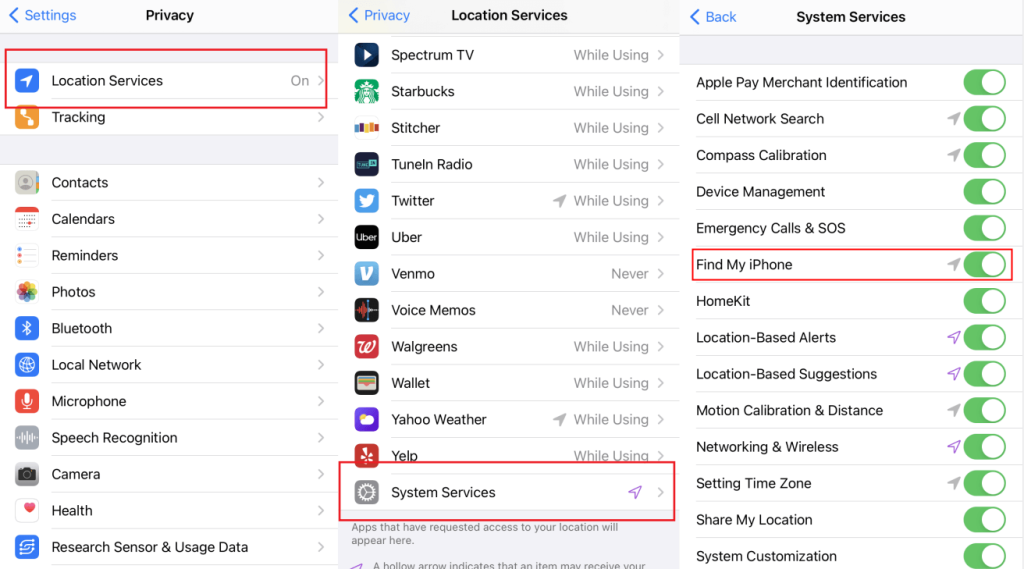
If you have enabled Find My iPhone, you’ll need to disable it before performing a factory reset. Go to Settings > [Your Name] > Find My > Find My iPhone and turn off the toggle.
Enter Apple ID and Passcode (if applicable)
After initiating the factory reset, your iPhone will ask you to enter your Apple ID and passcode to confirm the erase.
Wait for the Reset to Complete
The factory reset process might take a few minutes to complete. Your iPhone will restart, and you’ll be greeted with the initial setup screen as if the device were brand new.
Restore Your iPhone
After the factory reset, you can choose to set up your iPhone as a new device or restore it from your backup. If you backed up your iPhone using iCloud, select “Restore from iCloud Backup” during the setup process and follow the on-screen instructions. If you backed up with iTunes/Finder, connect your iPhone to your computer, open iTunes or Finder, and select “Restore Backup.”
Closing Remarks
Resetting your iPhone can be a powerful troubleshooting tool, but it’s essential to approach it with caution. Remember to back up your iPhone before proceeding with any reset, especially a factory reset, as it will erase all data. Soft resets (force restarts) are useful for addressing minor issues, while factory resets should be used when troubleshooting more persistent problems or preparing your device for resale. By following the steps outlined in this guide, you can safely and effectively reset your iPhone and resolve various issues to ensure optimal performance and functionality.

