Whether you want to show off your neat home screen to your friends, attach a few in-app shots to an article, or take a snapshot of a spicy email your ex sent you, the iPad lets you screenshot without much fuss. The simple guide below will show you how to take a screenshot on iPad without having to download any app.
- Know that you can take a screenshot of anything that appears on your iPad screen, whether it’s an app page, a web page, a photo gallery, a settings window, or an email.
- Make sure you use iOS 2 or higher.
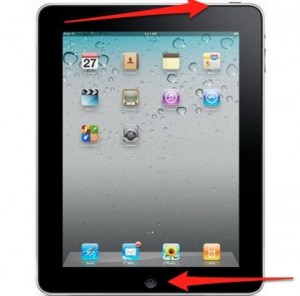
- Put your hand on the Sleep/Wake button located at the top right of your iPad. Don’t use it yet though. You don’t want to turn your iPad off.
- Put your other hand on the Home button located at the bottom of your iPad.
- Hold down the Sleep/Wake and Home buttons for one second and then release them.
- Alternatively, you can press and hold the Home button and then move the Sleep/Wake button.
- Your iPad will make a sound like a camera shutter, and the screen will turn white for a moment.
- Go to Photos > Camera Roll and look for your new screenshot, which should be the final image at the bottom.
- To email the new screenshot you’ve taken, tap the menu icon, the rectangle with the arrow coming out of it.
Before you learn how to take a screenshot on iPad you might have to practice a little while with those buttons, but soon enough you’ll be able to take shots with ease.
Using the button combination described above to take screenshots on your iPad is easier and more convenient than installing a video or photo editing app that comes with the screenshot feature. The only difference between such a feature and the default screenshot one is only that instead of using two device buttons you tap an on-screen button.
What are you waiting for? Now that you know how to take a screenshot on iPad go and take a few shots.

