Voice Texts are a cool new feature introduced in iOS 8 which allows you to send small audio notes from your iPhone to another iOS or Mac device that supports iMessages. Quicker to compose, more fun, and in many ways more convenient than traditional text messages, voice texts offer you a fast and more personal way to keep in touch with friends and family. Because they are a new feature, voice texts may seem a bit confusing at first, but in this easy guide you’ll learn how to voice text on iPhone in no time.
- Launch the Messages app.
- Create a new iMessage.
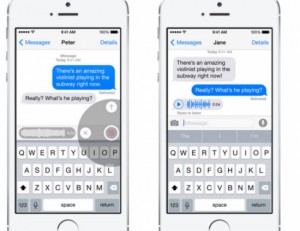
- Tap and hold on the microphone icon and speak your message. Make sure you hold your finger on the microphone, else the message won’t be recorded – merely tapping on it won’t do.
- When you’re done, release the button to end the recording.
- To listen to your new voice text, tap on the Play button on-screen.
- To send the voice text tap on the upward facing arrow. If the microphone icon doesn’t appear next to the message input box, it means the recipient isn’t using iMessage.
- To delete the voice text, tap on the X button.
- That’s it! You’ve just learned how to voice text on iPhone with iOS 8.
Any voice texts you send will appear in the message thread window, where they will be playable by both you and the recipient until they expire. By default, iOS auto-deletes audio and video messages to save space on your device, but you can change the audio note expiration setting in your device’s Settings, or disable auto-delete altogether.
Now that you know how to voice text on iPhone, you can send your family and friends audio notes that are more personal than text messages, and that are also easier to compose on the go.
Keep in mind that voice texts have been introduced only in iOS 8. Earlier iOS versions lack audio texting support, though you can use Siri to dictate standard text messages.


